Getting started with WebGL
I’ve been looking into browser graphics and WebGL lately. OpenGL/WebGL is a huge and pretty intimidating topic, so I thought I’d take some notes and share them here.
What is WebGL?
WebGL is a javascript API that most modern browsers implement. It allows your javascript to render graphics to an HTML5 canvas element. It mimics the well established OpenGL API that’s been around for ages. It is being developed by the the Khronos Group, a non-profit organization that initially included all the major browser vendors (Google, Microsoft, Apple and Mozilla), among many other tech players: Nvidia, Sony, Intel, Valve, and, funily enough, IKEA.
Because WebGL talks directly to the GPU, it’ll feel like a very low-level standard to the average javascript developer used to high-level interpreted languages. Programming graphics with WebGL feels more akin to C programming than it does programming for the web. Having said that, because it is such a low-level API, it’s possible to tweak performance-sensitive code to its limit.
To give you a taste of what’s possible when we use the GPU to render our graphics, here’s a publicly available creation hosted on Shadertoy. Safe to say I’m nowhere near making something as elaborate as this.
Can you believe that is completely rendered on the fly, within the browser?
How does it work?
So this is the painful part. While the WebGL specification is extremely versatile and powerful, it’s not exactly a joy to work with. A typical flow chart you’ll see pop up is
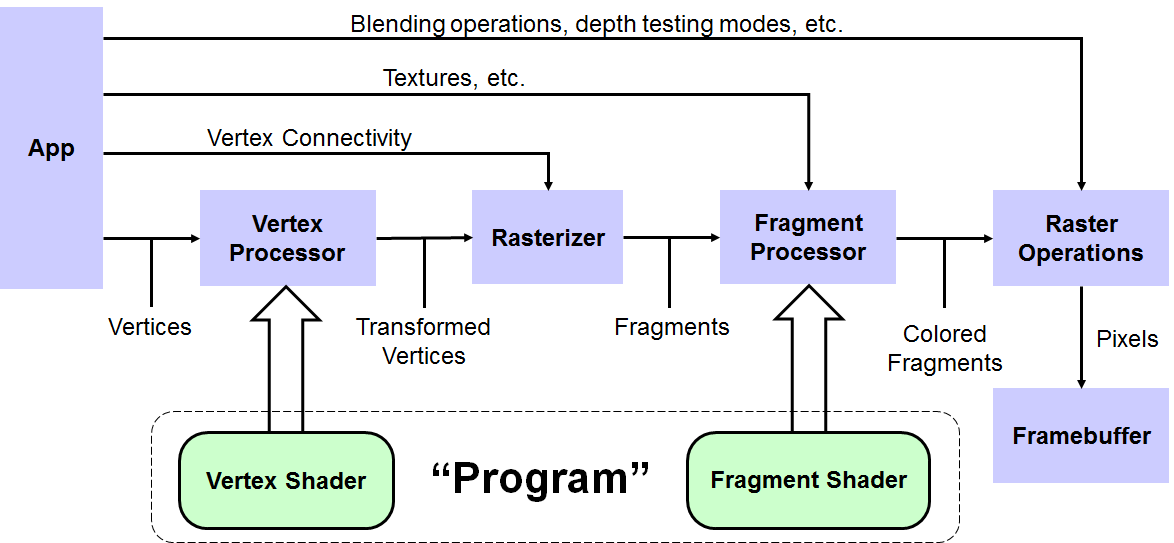
Yikes! I’ll try to minimize the nitty gritty details and keep the discussion at a higher level. Still, after reading this, hopefully the flow chart will make a little more sense.
Any WebGL application consists of two parts: the javascript side and the GPU
side. Typically, you’ll have some model in terms of javascript primitives
(arrays, floats, maybe even higher level concepts like a Cube or Sphere).
Then there’s the code you supply to the GPU that actually renders whatever it is
you want to render. There’s two aspects to this that the GPU can parallelize for
you. The first is transforming the coordinates that you supply into coordinates
that will actually be rendered to the canvas. The former are typically called
”world coordinates”, where the latter are the ”clip coordinates”. Maybe we
want the view to rotate, pan or zoom, so that the coordinates (potentially
thousands of coordinates!) need to get transformed at a rate of 60 frames per
second! The second way the GPU can help out is by calculating, for every single
pixel on the canvas, what color it should get, dependent on potential light
sources, shadows, etc…
You’ll notice that both of these problems can actually be broken down into thousands of smaller, independent problems: how every point should transform, how every pixel should be colored. To instruct the GPU how to do this, we supply programs called ”shaders“.1 They’re written in a low-level, C-like language called GLSL (GL Shader Language) that gets compiled to machine code and sent to the GPU. The program that deals with the first problem (that of transforming the points in our model) is called a vertex shader (the points in a 3D model are called vertices). The shader that takes care of coloring the pixels is called a fragment shader.
So, to reiterate: every WebGL project consists of two parts: a javascript model, and a pair of Vertex and Fragment shaders (jointly called a ”program”).
Nothing we’ve discussed so far actually involves WebGL. The shaders, written in GLSL, are the same shaders you’d write if you were doing OpenGL graphics on a game engine or for an Android phone. Where WebGL comes in is by supplying us with an API that lets us bind our high level javascript data and shader programs to the memory buffers that the GPU can access. Let’s run through a quick and dirty example of how that would work.
Drawing a triangle: the hello world of graphics
When I’m learning new things, I derive a special kind of joy knowing I’m stepping in the same footsteps as everyone else who’s tackled the same subject. Generations upon generations of pianists learned from Czerny, every single programmer starts off with a “Hello World”, and, it seems like, every graphics programmer starts off drawing this:
A fair warning: if you're just beginning to dabble with WebGL, the following code will seem excessive. Vanilla WebGL programming is _a lot_ of boilerplate. That's why there are a plethora of popular WebGL frameworks that abstract away most of the nitty gritty. Instead, they allow you to define your graphics in terms of more intelligible concepts like "scenes" and "cameras". The framework will then handle all the initializations and data binding for you.Setting up the WebGL context
At the end of the day, the WebGL API functions as one of the backends to the
HTML <canvas> element. So, a good first place to start our project is to
stub out a simple index.html with an empty <canvas> element on it.
<!doctype html>
<!-- index.html -->
<html>
  <head>
    <title>Hello World</title>
    <script src="index.js"></script>
  </head>
  <body onload="main()">
    <canvas id="webglCanvas" width="800" height="600"></canvas>
  </body>
</html>
Note that we gave the <canvas> an id so that we can reference it from our
javascript. I also went ahead and added a <script> tag to include our
javascript code, and added an onload attribute to the <body> tag that will
load our program after the page is done rendering. This is important, since
we’ll want our <canvas> element to have been added to the DOM before we try
rendering to it.
Our javascript code for now will simply attach a WebGL context to our canvas that we will work with. Just to check if things are working, we color the canvas black.
// index.js
function main() {
  const canvas = document.getElementById('webglCanvas');


  // Create a WebGL context for the canvas element
  const gl = canvas.getContext('webgl');

  if (!gl) {
    console.warn("Your browser does not support WebGL!");
    return;
  }

  // Clear the canvas with black
  gl.clearColor(0.8, 1.0, 1.0, 1.0); // Set clear color (RGB + alpha)
  gl.clear(gl.COLOR_BUFFER_BIT); // Clear the color buffer with the clear color
}
Cool, that works. We’ve created a WebGL context and stored it in the gl
object for future use. It’s this gl object exposes the WebGL API, which we’ll
use to interact with the canvas. There are several other of these “contexts”
that expose different APIs to render to a <canvas>, we just happen to be
interested in the webgl context.
In the last couple of lines, we clear the “color buffer” with a clear color of
our choosing (I picked black, in RGBA format). The gl.COLOR_BUFFER_BIT is
one of many constants that WebGL exposes, all with equally scary and arcane
names. WebGL uses these constants to refer to all the internal memory buffers
it has access to. In this case, we take the color buffer that holds all the
color information that is currently rendered to the canvas, and sets all the
values to black.
Next, we’ll need something to render. That brings us right to the heart of our WebGL demo: the shaders.
The vertex shader
A vertex shader is a program that we supply to our WebGL context. It’s sole responsibility is to read in a bunch of data (that it gets handed from our javascript code), do whatever calculations we need to transform this data into the coordinates of a single vertex point in our rendered graphic. That’s right, the vertex shader only outputs a single vertex. The magic lies in the fact that this one program may get run hundreds or thousands of times, in parallel, on the many cores the GPU provides us. Every instance of the program will receive different inputs, so it will return a different vertex output.
Both the vertex and fragment shaders are written in GLSL, a C-like, somewhat clunky language. Going over the syntax and intricacies of GLSL is way beyond the scope of Let’s see what the simplest possible vertex shader looks like.
// vertex shader
attribute vec4 a_position;

void main() {
  gl_Position = a_position;
}
There’s not a whole lot going on here. As you can see, GLSL has a very C-like ( and by proxy, a very javascript-like) feel to it. There’s two things happening in this small program:
- We define an attribute
a_position2 that has the typevec4(a four component vector). Attributes are like variables that get bound to data that the shader can read from an input buffer. Theattributekeyword basically means: “Hey, I want you to read this variable from the buffer of data that you’re going to get from javascript land”. How exactly the program is meant to read it from the buffer, we’ll discuss later on. - The second part of the program is the
main()function. Every shader program defines amain()function that gets called when WebGL runs our code. Like we said before: the only job a vertex shader has is to take the inputs and output a single vertex position. The vertex shader does this by storing it in a dedicated variablegl_Positionthat will get passed down the rendering pipeline. In this case, we’re not doing any fancy calculations just yet: we’re simply passing through the input data intogl_Positionas is.
Since we want to draw a triangle, all we have to do is pass in three points that form a triangle as inputs from javascript. You might also be wondering why we would use a four component vector for a 3D position. The first three components will simply be the spatial coordinates of the point. The fourth component is a bit of a technicality that I won’t go into right now.
Next up, let’s have a look at the fragment shader that will be responsible for coloring in our canvas.
The canvas shader
Much like the vertex shader, the fragment shader’s job is to output the color of
a single pixel of our canvas. It also gets run with different inputs (the
canvas coordinates of the pixel) thousands of times in parallel. In the same
way that the vertex shader had a main() function that was responsible for
setting the special variable gl_Position, the fragment shader will store the
pixel’s color in a special variable called gl_FragColor:
// fragment shader
precision mediump float; // set the float precision

main() {
  gl_FragColor = vec4(1.0, 0.0, 0.5, 1.0);
}
vec4 is a constructor that lets us create a 4 component vector. Just like the
position vectors in our vertex shader, colors are represented by four-component
vectors representing the RGBA values of the pixel (where all the values range
from 0.0 to 1.0). This program sets all the pixels, regardless of their
coordinates, to a pinkish purple.
Gluing it all together
Up until a couple of years ago, inserting these GLSL programs into your javascript application was a bit of a mess. I’ve seen people store them line by line in an array and afterwards concatenating the whole thing. Nowadays, with ES6 template strings, we can simply insert them as multiline strings. Even better, if you have a webpack project, you can save them in their own files and let webpack do the loading for you. For our purposes, let’s just insert them in multiline strings:
// index.js
const vShaderSource = `
attribute vec4 a_position;

void main() {
  gl_Position = a_position;
}
`

const fShaderSource = `
precision mediump float; // set the float precision

main() {
  gl_FragColor = vec4(1.0, 0.0, 0.5, 1.0);
}
`

// ...
Next up, we want to feed this source code into our WebGL program. We use the
loadShader method provided by our gl object to load the source code and
store it in the designated memory buffer. Since we’ll be performing the exact
same steps for both the vertex and fragment shaders, we’ll create a general
purpose routine that creates and compiles a shader from its source code.
function loadShader(gl, type, source) {
  const shader = gl.createShader(type); // Create a shader object

  gl.shaderSource(shader, source); // Attach the source code to it

  gl.compileShader(shader); // Compile the source code

  if (!gl.getShaderParameter(shader, gl.COMPILE_STATUS)) {
    console.error("Could not compile shader source code. ", gl.getShaderInfoLog(shader));
    gl.deleteShader(shader);
    return null;
  }

  return shader;
}
Next, we want to use this routine to create our two shaders and attach them to our “program”. The procedure is pretty similar to how we created the shaders: we create an empty “program” object. Then we attach the compiled shaders to the program. Finally, much like a C program, we have a step that links the compiled shaders into a single binary.
const vertexShader = loadShader(gl, gl.VERTEX_SHADER, vShaderSource);
const fragmentShader = loadShader(gl, gl.FRAGMENT_SHADER, fShaderSource);

const shaderProgram = gl.createProgram();
gl.attachShader(shaderProgram, vertexShader);
gl.attachShader(shaderProgram, fragmentShader);
gl.linkProgram(shaderProgram);

if (!gl.getProgramParameter(shaderProgram, gl.LINK_STATUS)) {
  console.error("Could not link program. ", gl.getProgramInfoLog(shader));
  gl.deleteProgram(shaderProgram);
}
Passing in the data: attributes, uniforms and varyings
Okay, so now we have our “program” compiled and linked. The only thing that’s left for us to do is tell our shaders where to get the data they need to perform their calculations.
Data in WebGL is made available to the GPU through buffers. These are basically containers that will hold any (binary) information you want. This data could be coordinates, transformation matrices, color data, even entire image textures. This data gets read by our vertex shader. Because the buffers are just arrays of anonymous data, we have to be explicit in telling the vertex shader how to pull the data out of the buffer. For example:
“The first three 32-bit floats you’ll be reading represent that attribute there. The next 16 32-bit floats after that are the components of rotation matrix. Don’t worry about the data after that, that’s for the next shader instance running on another GPU core.”
This is probably a good time to also quickly go over the main types of “variables” that WebGL provides.
First off, there’s the attributes that we talked about before. These are essentially data that each instantiation of the vertex shader will pull from the shared array buffer. Every instance will read data from a different position in the buffer, so these are great for passing in the data that is specific to every independent calculation, like positions and colors.
Next up are uniforms. These are “global” variables that are visible to every thread on the GPU. These are great for coordinate transformation matrices that are the same for every single vertex.
Varyings are the means by which we can pass data from the vertex shader into the fragment shader that runs after it.
Let’s define and pass in the data that will make up our triangle then! We’ll store the coordinates we need in a javascript array. Since our triangle is essentially 2D, we only need to pass in 2 coordinates per vertex.
After that, we’ll create a buffer and store our vertices in it. We’ll go through the same procedure that we’ve followed a couple of times already: we create a new object (our buffer object) which we then bind to one of the many buffers that WebGL exposes for up (we’re using the array buffer here). Once it’s bound to the GPU, we can store our data in there.
let triangle = new Float32Array([
   0.0,  0.5, 0.0, 1.0,
  -0.5, -0.5, 0.0, 1.0,
   0.5, -0.5, 0.0, 1.0,
]);

let triangleBufferObject = gl.createBuffer();
gl.bindBuffer(gl.ARRAY_BUFFER, triangleBufferObject);
gl.bufferData(gl.ARRAY_BUFFER, triangle, gl.STATIC_DRAW);
Notice that we wrapped our vertex coordinates in a Float32Array. Javascript’s
floats are 64 bit floats by default, but the GPU is expecting 32 bit floats.
Javascript exposes this Float32Array that conveniently casts our data to
32 bit floats. The gl.STATIC_DRAW is a flag to help WebGL out. It basically
tells WebGL not to expect this data to change. We’re not animating anything
just yet, we’re just drawing a static triangle for now.
Next, we need to explain how our data is going to relate to the attributes that we’re using in our shader programs.
In all of this it’s important to keep in mind that the javascript side of things has no idea what’s going on inside our shader program! For all we’re concerned, the shader program is a compiled binary that we have no access to.
WebGL lets us define an attribute location to represent a particular attribute of our program. We can then define precisely how many floats of our buffer are meant to go to that particular location.
let positionAttribLocation = gl.getAttribLocation(shaderProgram, "a_position");

gl.enableVertexAttribArray(positionAttribLocation);

gl.vertexAttribPointer(
  positionAttribLocation, // Location of the attribute
  4,                      // How many elements per attribute
  gl.FLOAT,               // Attribute type
  gl.FALSE,               // Do we want our values to get normalized?
  4 * Float32Array.BYTES_PER_ELEMENT, // Offset of where to read next (stride)
  0                       // Start reading the buffer at this offset
);
While you might think positionAttribLocation is some sophisticated object
holding a whole bunch of metadata about the shader program, it’s not.
Attribute locations in WebGL are simply unsigned integers that index the
different attributes our vertex shader uses. In our case, the a_position
attribute is the first and only attribute, so it would simply be at index 0.
Using getAttribLocation is preferred, however, since the indexes will change
if we add, remove or reorder our attributes. getAttribLocation will make sure
we always have the correct index corresponding to the attribute we want.
For some, unexplained reason, attributes in WebGL are disabled by default:
every attribute we want to use (and, hence, provide data for through our
buffer), we need to explicitly enable using enableVertexAttribArray(), along
with the index of the respective attribute. Lastly, we give a detailed layout
of how the data in the buffer should be interpreted.
Drawing the buffers
Let’s wrap this up then, and have a look at what we’ve created! All that’s left is to select the program we want to use (we only have the one, right now), and draw all the buffers!
gl.useProgram(shaderProgram);
gl.drawArrays(
  gl.TRIANGLES, // Draw triangle tesselations between vertices
  0,            // Index where to start in the array buffer
  3             // How many indices to be rendered
);
Adding some color
Oh glory! We made it! We have our triangle! A quick and easy way to add some color to this triangle would be to use the positions to determine the color of each pixel that the fragment shader colors. We can pass the coordinates from the vertex shader to the fragment shader using a varying. Let’s see what that would look like:
  // vertex shader
  attribute vec4 a_position;
  varying vec4 v_position;

  void main() {
    v_position = a_position;
    gl_Position = a_position;
  }
We can read this varying in the fragment shader like so:
  precision mediump float; // set the float precision
  varying vec4 v_position;

  void main() {
    gl_FragColor = 0.5 * (1.0 + v_color);
  }
Notice that the clip space coordinates run from -1 to 1, so raw position vectors don’t make the best color vectors. A quick trick is to normalize the position vector so its components run from 0 to 1:
Conclusion
Phew, that was a long process, just to draw a couple of vertices! I’ll probably throw the complete code up on github if you’d like to read through it in its entirety.
The good news is: we’ve gone over most of the typical WebGL boilerplate, and there isn’t really much more beyond this point. Another upside is: you’re very unlikely to be writing this boilerplate code yourself. Instead, most people use some kind of library that handles all the data binding behind the screens. WebGL libraries go from all-in-one, batteries-included libraries like Three.js or more minimal wrappers like regl. Believe you me, any future WebGL posts I write will definitely make use of one of these libraries. That’s all for now!